
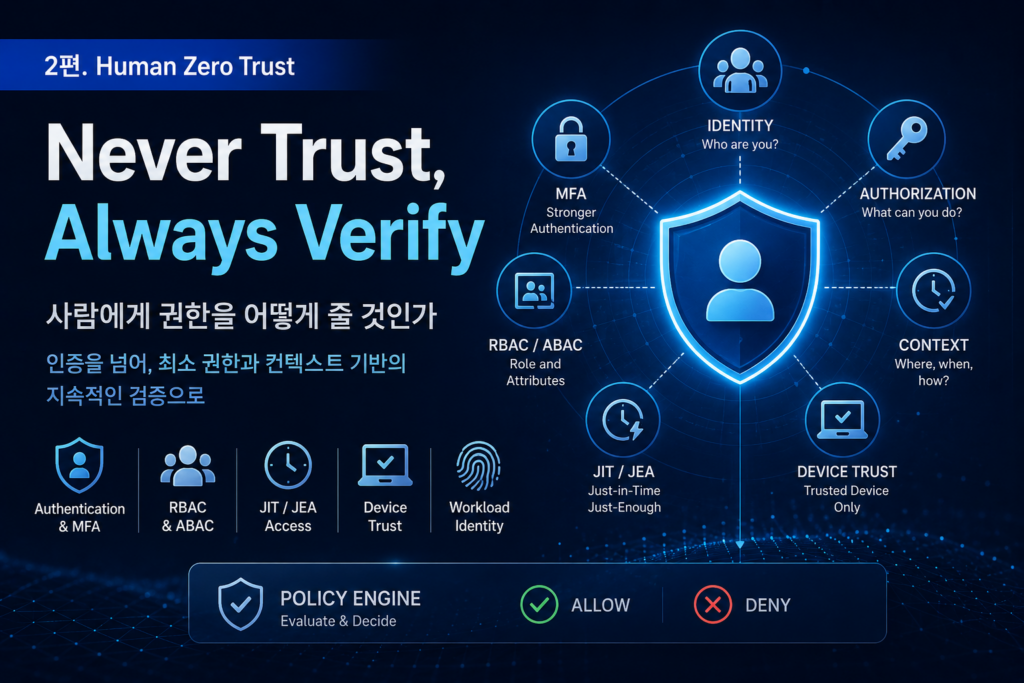
1편에서는 누구도 기본적으로 신뢰하지 않고, 모든 요청을 검증한다는 Zero Trust의 핵심 원칙을 살펴봤다. 하지만 이 원칙을 실제 시스템에 적용하려면 더 어려운 질문이 남는다.
사람에게는 어떻게 권한을 부여해야 하는가?
사용자를 인증하는 것만으로는 부족하다. 사용자가 누구인지 알고 있어도 어떤 Resource에 접근할 수 있는가? 어떤 Action을 수행할 수 있는가? 언제 접근할 수 있는가? 어떤 Device에서 접근하고 있는가? 이 작업은 일반적인 행동인가? 지금 이 사용자에게 이 권한이 정말 필요한가?를 판단해야 한다.
Human Zero Trust는 결국 이 사람이 누구인지, 이 사람이 지금 이 작업을 수행해도 되는지로 보안의 초점을 확장하여 해결하는 과정이다.
1. Authentication에서 시작한다
Zero Trust의 출발점은 Identity다. 사용자가 시스템에 접근하려면 먼저 자신의 Identity를 증명해야 한다.
flowchart LR
    User["Human"]
    IdP["Identity Provider"]
    Identity["Authenticated Identity"]
    User -->|"Authenticate"| IdP
    IdP --> Identity
이때 일반적으로 Identity Provider를 사용하며 대표적으로 OIDC, SAML, LDAP과 같은 기술이 있다. 현대적인 Web Application에서는 OIDC가 널리 사용된다. 하지만 1편에서 알아본 바와 같이 Authentication만으로는 충분하지 않다.
flowchart LR
    Identity["Authenticated Identity"]
    Authorization["Authorization"]
    Resource["Resource"]
    Identity --> Authorization
    Authorization --> Resource
Zero Trust에서는 Authorization과 Authentication을 명확하게 분리해야 한다.
2. MFA — Identity를 더 강하게 증명하기
Password 하나만으로 Identity를 증명하는 것은 위험하다. Password가 탈취되면 공격자는 정상 사용자처럼 행동할 수 있기 때문이다. 그래서 Multi-Factor Authentication(MFA)을 사용한다. 대표적인 Factor는 다음과 같이 구분할 수 있다.
flowchart TD
    MFA["Multi-Factor Authentication"]
    Knowledge["Something you know"]
    Possession["Something you have"]
    Inherence["Something you are"]
    MFA -->|Password| Knowledge
    MFA -->|Security Key| Possession
    MFA -->|Biometric| Inherence
MFA의 목적은 Authorization을 결정하는 것이 아니다. Identity를 탈취하기 어렵게 만드는 것이다. 따라서 MFA를 적용했다고 해서 Zero Trust가 완성되는 것은 아니다. MFA는 Zero Trust의 Authentication 계층을 강화한다.
flowchart LR
    User["User"]
    MFA["MFA"]
    Identity["Verified Identity"]
    Policy["Authorization Policy"]
    Resource["Resource"]
    User --> MFA
    MFA --> Identity
    Identity --> Policy
    Policy --> Resource
3. RBAC — 역할에 권한을 부여한다
사용자마다 권한을 직접 부여하기 시작하면 관리가 어려워진다. 사용자가 늘어나고 관리해야 할 Resource가 늘어날 수록 권한 관리가 복잡해진다.
flowchart TD
    Alice["Alice"]
    Bob["Bob"]
    Charlie["Charlie"]
    Read["Read Orders"]
    Create["Create Orders"]
    Delete["Delete Orders"]
    Alice --> Read
    Alice --> Create
    Bob --> Read
    Bob --> Create
    Charlie --> Read
    Charlie --> Create
    Charlie --> Delete
이를 해결하기 위한 대표적인 방법이 Role-Based Access Control다.
flowchart LR
    User["User"]
    Role["Role"]
    Permission["Permission"]
    Resource["Resource"]
    User --> Role
    Role --> Permission
    Permission --> Resource
flowchart LR
    Engineer["Platform Engineer"]
    Viewer["Viewer"]
    Admin["Administrator"]
    Read["Read"]
    Deploy["Deploy"]
    Delete["Delete"]
    Engineer --> Read
    Engineer --> Deploy
    Viewer --> Read
    Admin --> Read
    Admin --> Deploy
    Admin --> Delete
이렇게 하면 사용자가 어떤 역할을 가지고 있는지에 따라 권한을 관리할 수 있다. RBAC는 단순하고 이해하기 쉽다. 하지만 시스템이 복잡해질수록 새로운 문제가 나타난다.
4. RBAC의 한계
예를 들어 Platform Engineer라는 Role이 있다고 하자.
flowchart LR
    User["Platform Engineer"]
    Role["platform-engineer"]
    Permission["Deploy"]
    User --> Role
    Role --> Permission
이것만으로는 어떤 환경에 Deploy 할 수 있는가? 질문에 답하기 어렵다. 개발 환경에서는 허용하지만 Production에서는 제한하고 싶을 수 있다. 또는 업무 시간에만 가능한가? 회사에서 관리하는 Device에서만 가능한가?
이러한 요구사항을 표현하기 시작하면 Role만으로는 부족하다. 이때 등장하는 것이 ABAC다.
flowchart TD
    Identity["Identity"]
    Role["Role"]
    Resource["Resource"]
    Action["Action"]
    Context["Context"]
    Identity --> Policy["Policy Evaluation"]
    Role --> Policy
    Resource --> Policy
    Action --> Policy
    Context --> Policy
    Policy --> Allow["ALLOW"]
    Policy --> Deny["DENY"]
5. ABAC — Context를 권한 판단에 포함한다
Attribute-Based Access Control는 사용자와 Resource의 Attribute를 기반으로 접근을 결정한다.
Identity:
    platform-engineer
Resource:
    production/payment-api
Action:
    deploy
Context:
    managed-device
flowchart LR
    Identity["Identity"]
    Role["Role"]
    Resource["Resource"]
    Action["Action"]
    Context["Context"]
    Policy["ABAC Policy"]
    Identity --> Policy
    Role --> Policy
    Resource --> Policy
    Action --> Policy
    Context --> Policy
    Policy -->|"ALLOW"| Deploy["Deploy"]
    Policy -->|"DENY"| Reject["Reject"]
이제 단순히 “Platform Engineer인가?”만 보는 것이 아니다. 다음과 같이 판단할 수 있다. Platform Engineer이면서 관리되는 Device를 사용하고 있고, Production의 payment-api를 Deploy하려는 요청인가?
flowchart TD
    Identity["platform-engineer"]
    Device["managed-device"]
    Resource["production/payment-api"]
    Action["deploy"]
    Policy["Policy"]
    Allow["ALLOW"]
    Identity --> Policy
    Device --> Policy
    Resource --> Policy
    Action --> Policy
    Policy --> Allow
ABAC의 장점은 Context를 권한 결정에 포함할 수 있다는 것이다.
6. Context가 중요해진다
Zero Trust에서는 Identity만으로 접근을 결정하지 않는다. 같은 사용자라도 상황에 따라 결과가 달라질 수 있다.
flowchart TD
    User["platform-engineer"]
    Context["Request Context"]
    Device["Device"]
    Location["Location"]
    Time["Time"]
    Network["Network"]
    Risk["Risk"]
    User --> Context
    Device --> Context
    Location --> Context
    Time --> Context
    Network --> Context
    Risk --> Context
    Context --> Policy["Policy"]
Managed Device
+
Normal Location
+
Business Hours
+
Low Risk
위의 경우 Production Deploy를 허용할 수 있다. 반면에 아래와 같은 경우 동일한 사용자라도 거부하거나 추가 인증을 요구할 수 있다.
Unknown Device
+
Unusual Location
+
High Risk
flowchart LR
    Identity["Same Identity"]
    Normal["Normal Context"]
    Risky["Risky Context"]
    Normal --> Allow["ALLOW"]
    Risky --> StepUp["Step-up Authentication / DENY"]
    Identity --> Normal
    Identity --> Risky
이것이 Zero Trust에서 Context가 중요한 이유다.
7. JIT — 필요한 순간에만 권한을 준다
Least Privilege를 더 발전시키면 다음 질문이 나온다.
항상 권한을 가지고 있어야 하는가?
예를 들어 Database Administrator에게 Production Database의 관리자 권한을 항상 부여하는 것은 위험할 수 있다.
flowchart LR
    Admin["Database Administrator"]
    Permanent["Permanent Admin Permission"]
    Database["Production Database"]
    Admin --> Permanent
    Permanent --> Database
대신 필요한 순간에만 권한을 부여할 수 있다. 이를 JIT(Just-In-Time) Access라고 한다.
sequenceDiagram
    participant User
    participant Access as Access System
    participant Policy as Policy Engine
    participant Resource
    User->>Access: Request Temporary Access
    Access->>Policy: Evaluate Request
    Policy-->>Access: ALLOW
    Access-->>User: Temporary Permission
    User->>Resource: Perform Action
    Resource-->>User: Result
    Access->>Access: Permission Expires
이렇게 하면 권한의 Lifetime을 줄일 수 있다.
flowchart LR
    Permission["Permission"]
    Long["Long Lifetime"]
    Short["Short Lifetime"]
    Permission --> Long
    Permission --> Short
    Long --> Large["Larger Exposure"]
    Short --> Small["Smaller Exposure"]
JIT의 핵심은 단순하다.
필요할 때만, 필요한 권한을, 필요한 시간 동안 제공한다.
8. JEA — 필요한 작업만 허용한다
JIT가 “언제 권한을 줄 것인가”에 집중한다면 JEA(Just Enough Administration)는 “어떤 권한을 줄 것인가”에 집중한다.
예를 들어 Administrator 권한 전체를 부여하는 대신 필요한 작업만 허용한다.
flowchart LR
    Operator["Operator"]
    Permission["Permission"]
    Permission --> Restart["Restart Service"]
    Permission --> ReadLogs["Read Logs"]
    Permission --> ReadStatus["Read Status"]
    Operator --> Permission
이것은 AI Agent의 권한 설계에서도 매우 중요한 개념이 된다.
Agent에게 아래의 두 내용은 완전히 다른 보안 모델이다.
Kubernetes Administrator
Restart Deployment
Read Pod Logs
Scale Deployment
9. Device Trust
Identity만으로 충분하지 않은 경우도 있다. 사용자가 정상적으로 인증했더라도 공격자가 탈취한 Device에서 접근하고 있을 수 있기 때문이다. 따라서 Device 자체의 상태를 Policy에 포함할 수 있다.
flowchart LR
    User["User"]
    Device["Device"]
    DeviceState["Device Trust"]
    User --> Device
    Device --> DeviceState
    DeviceState --> Policy["Policy"]
예를 들어 아래의 경우 이 사용자가 누구인가? 뿐만 아니라 어떤 Device에서 접근하고 있는가?까지 고려할 수 있다.
flowchart TD
    Device["Device"]
    Managed["Managed"]
    Patched["Security Patch Current"]
    Encrypted["Disk Encrypted"]
    Compliant["Compliant"]
    Device --> Managed
    Device --> Patched
    Device --> Encrypted
    Device --> Compliant
    Managed --> Policy["Device Trust Policy"]
    Patched --> Policy
    Encrypted --> Policy
    Compliant --> Policy
    Policy --> Allow["ALLOW"]
    Policy --> Deny["DENY"]
## 10. Workload Identity
Human뿐만 아니라 Workload에도 Identity가 필요하다. Microservice Architecture에서는 Service A가 Service B를 호출하는 상황이 끊임없이 발생한다.
flowchart LR
    ServiceA["Service A"]
    ServiceB["Service B"]
    Resource["Resource"]
    ServiceA --> ServiceB
    ServiceB --> Resource
이때 단순히 IP Address를 기준으로 신뢰하면 문제가 생긴다. 대신 Workload 자체에 Identity를 부여한다.
flowchart LR
    ServiceA["Service A"]
    IdentityA["Workload Identity A"]
    ServiceB["Service B"]
    IdentityB["Workload Identity B"]
    ServiceA --> IdentityA
    ServiceB --> IdentityB
그리고 Service-to-Service 요청을 Policy로 평가한다.
flowchart LR
    IdentityA["Service A Identity"]
    Resource["Service B"]
    Action["POST /orders"]
    Policy["Policy Engine"]
    IdentityA --> Policy
    Resource --> Policy
    Action --> Policy
    Policy -->|"ALLOW"| Request["Request"]
    Policy -->|"DENY"| Reject["Reject"]
대표적인 기술로는 다음과 같은 것들이 있다.
– SPIFFE / SPIRE
– OIDC Federation
– Kubernetes Workload Identity
– AWS IAM Roles for Service Accounts 계열
– Cloud Provider Workload Identity
사람뿐만 아니라 Workload도 하나의 Security Principal로 취급하는 것이 중요하다.
11. Short-lived Credential
Workload Identity와 함께 중요한 것이 Credential의 Lifetime이다. 다음과 같이 장기간 사용할 수 있는 Credential을 애플리케이션에 직접 저장하는 것은 위험하다.
flowchart LR
    Application["Application"]
    Credential["Long-lived Credential"]
    Resource["Resource"]
    Application --> Credential
    Credential --> Resource
Credential이 유출되면 공격자가 오랫동안 사용할 수 있기 때문이다. 대신 Identity를 기반으로 임시 Credential을 발급할 수 있다.
sequenceDiagram
    participant Workload
    participant IdP as Identity Provider
    participant STS
    participant Resource
    Workload->>IdP: Authenticate
    IdP-->>Workload: Identity Token
    Workload->>STS: AssumeRole
    STS-->>Workload: Temporary Credential
    Workload->>Resource: API Request
    Resource-->>Workload: Response
예를 들어 AWS STS의 Temporary Security Credentials가 이러한 방식으로 사용될 수 있다. 하지만 Short-lived Credential도 만능은 아니다. Credential이 유효한 시간 동안에는 여전히 악용될 수 있다. 따라서 최소 권한 정책 등 다음을 함께 고려해야 한다.
flowchart LR
    Identity["Identity"]
    ShortLived["Short-lived Credential"]
    LeastPrivilege["Least Privilege"]
    Policy["Policy"]
    Audit["Audit"]
    Identity --> Security["Security Boundary"]
    ShortLived --> Security
    LeastPrivilege --> Security
    Policy --> Security
    Audit --> Security
## 12. Policy Engine
여기까지 살펴보면 하나의 구조가 반복해서 등장한다. Identity가 있고, Resource가 있고, Action이 있고, Context가 있다. 그리고 이 정보를 바탕으로 Policy를 평가한다.
flowchart LR
    Identity["Identity"]
    Resource["Resource"]
    Action["Action"]
    Context["Context"]
    Risk["Risk"]
    Policy["Policy Engine"]
    Identity --> Policy
    Resource --> Policy
    Action --> Policy
    Context --> Policy
    Risk --> Policy
    Policy -->|"ALLOW"| Allow["ALLOW"]
    Policy -->|"DENY"| Deny["DENY"]
실제 구현에서는 Policy Decision Point와 Policy Enforcement Point를 분리할 수 있다.
flowchart LR
    Request["Request"]
    PEP["Policy Enforcement Point"]
    PDP["Policy Decision Point"]
    Resource["Resource"]
    Request --> PEP
    PEP --> PDP
    PDP -->|"ALLOW"| PEP
    PDP -->|"DENY"| PEP
    PEP --> Resource
중요한 것은 특정 제품을 선택하는 것보다 Authorization을 애플리케이션 코드에서 분리하고 Policy로 관리할 수 있는 구조를 만드는 것이다.
13. Audit과 Observability
Zero Trust에서는 접근을 통제하는 것만으로 충분하지 않다. 누가 어떤 작업을 수행했는지 추적할 수 있어야 한다.
flowchart LR
    Identity["Identity"]
    Resource["Resource"]
    Action["Action"]
    Context["Context"]
    Decision["Policy Decision"]
    Audit["Audit Trail"]
    Identity --> Audit
    Resource --> Audit
    Action --> Audit
    Context --> Audit
    Decision --> Audit
최소한 다음과 같은 정보를 연결할 수 있어야 한다.
Who
What
When
Where
Why
Decision
이 정보는 보안 사고가 발생했을 때 매우 중요하다.
예를 들어 누가 Production Database를 삭제했는가? 라는 질문에 답할 수 있어야 한다.
flowchart TD
    Question["Who deleted Production Database?"]
    Identity["Identity"]
    Action["Delete"]
    Resource["Production Database"]
    Time["Time"]
    Context["Context"]
    Decision["ALLOW"]
    Question --> Identity
    Question --> Action
    Question --> Resource
    Question --> Time
    Question --> Context
    Question --> Decision
Authorization과 Observability는 서로 독립적인 기능처럼 보이지만 실제로는 함께 설계해야 한다.
14. Human Zero Trust Architecture
지금까지의 내용을 하나로 합쳐보자.
flowchart TD
    User["Human"]
    IdP["Identity Provider"]
    MFA["MFA"]
    Identity["Identity"]
    Device["Device Trust"]
    Context["Context"]
    Risk["Risk"]
    Policy["Policy Engine"]
    Resource["Resource"]
    Audit["Audit"]
    User --> IdP
    IdP --> MFA
    MFA --> Identity
    Identity --> Policy
    Device --> Policy
    Context --> Policy
    Risk --> Policy
    Policy -->|"ALLOW"| Resource
    Policy -->|"DENY"| Deny["DENY"]
    Identity --> Audit
    Device --> Audit
    Context --> Audit
    Policy --> Audit
    Resource --> Audit
이 구조에서 중요한 것은 Authentication 하나가 아니다. Identity를 확보하고, Context와 Risk를 확인하고, 최소 권한을 기반으로 Policy를 평가하고, 결과를 Audit할 수 있어야 한다.
15. Human Zero Trust의 한계
여기까지의 모델은 사람을 대상으로 한다. 사람은 일반적으로 요청을 하나 수행하고 결과를 확인한 뒤 다음 작업을 결정한다. 예를 들어 운영자가 payment-api의 최근 Error Log를 확인해줘. 라고 요청하면 사람이 결과를 보고 다음 행동을 결정한다.
sequenceDiagram
    participant User
    participant System
    participant Resource
    User->>System: Read Error Logs
    System->>Resource: Query Logs
    Resource-->>System: Log Result
    System-->>User: Show Logs
    User->>System: Decide Next Action
하지만 AI Agent는 다르다. 하나의 목표를 전달하면 Agent가 여러 Tool을 연속적으로 호출할 수 있다.
flowchart TD
    Goal["User Goal"]
    Agent["AI Agent"]
    Tool1["Tool 1"]
    Tool2["Tool 2"]
    Tool3["Tool 3"]
    Resource["Infrastructure"]
    Goal --> Agent
    Agent --> Tool1
    Tool1 --> Tool2
    Tool2 --> Tool3
    Tool3 --> Resource
이 순간 새로운 질문이 등장한다.
AI Agent가 다음 Tool을 호출할 권한이 있는가?
Agent가 스스로 생성한 다음 행동까지 신뢰할 수 있는가?
이 문제가 3편의 출발점이다.
마치며
Human Zero Trust는 오랜 시간에 걸쳐 발전해 왔다. Authentication에서 시작해 MFA를 도입했고, RBAC를 통해 역할을 관리했으며, ABAC를 통해 Context를 권한 판단에 포함했다. 그리고 JIT, JEA, Device Trust, Workload Identity 등을 통해 권한의 범위와 Lifetime을 줄여왔다.
전체적인 방향은 하나다.
더 정확하게 Identity를 확인하고, 더 작은 권한을, 더 짧은 시간 동안, 더 많은 Context를 고려하여 부여하는 것
하지만 AI Agent가 Infrastructure의 실행 주체가 되면 문제가 달라진다. 사람은 일반적으로 한 번의 요청을 수행하지만, Agent는 하나의 목표를 달성하기 위해 여러 Tool을 호출하고 여러 Resource를 변경할 수 있다. 따라서 다음 질문이 필요해진다.
AI Agent에게 어떤 권한을 줄 것인가?
다음 편에서는 이 문제를 본격적으로 다룬다. AI Agent의 Identity를 어떻게 만들 것인가? Agent가 호출할 수 있는 Tool을 어떻게 제한할 것인가? MCP(Model Context Protocol)를 사용하는 경우 Authorization은 어디에서 수행해야 하는가? 그리고 Agent가 `Tool → Resource → Action`을 연쇄적으로 수행할 때 Zero Trust를 어떻게 적용해야 하는가?
3편에서는 Zero Trust의 원칙을 AI Agent와 Agentic Infrastructure에 적용해본다.